Creating a Boggle Solver With the Power of WebAssembly and Rust
During the height of the COVID-19 quarantine period, one of the games I played most with my girlfriend and family was Boggle. Boggle is a time-based word game where you form as many words as possible from a randomized grid of letters. One of the questions that always came up was,
What if we could just take a picture and see all the possible words this board could have made?
After coming across Colin Eberhardt’s blog on a WebAssembly, Rust, OpenCV, and TensorFlow-powered Sudoku Solver which runs entirely in the browser, I knew building something similar for Boggle should be possible.
Over the last year I’ve taken a break from my undergraduate degree in Computer Engineering to do a 16-month internship. Having the extra free time after work and no school assignments looming over me, I thought this could be a cool project to chip away at.
In this article I will give you a brief look at the code, design, my thinking, successes, and failures of the different parts of this project. If you wish to see the source code its up on my GitHub, and you can find a live version of it on the Roggle Website!
The Tech Stack
- JavaScript - Used to run and manage the Web Workers + WebAssembly glue code that run the Boggle-solver
- SvelteKit - A JavaScript framework used for handling the routing, state, and UI of the Web Application.
- Rust - A fast, compiled language with a growing community in which the Boggle solver is written in
- WebAssembly (WASM) - A Web standard compile target which allows us to run non-web code on the web at near-native speeds
- TensorFlow.js (TFJS) - A machine learning library compiled to WebAssembly
- OpenCV.js - A computer vision library compiled to WebAssembly
- Python - Used in conjunction with the Python TensorFlow library for training the letter classifier
Overview
Below is a diagram which shows the step-by-step process of how the Web App takes an image, identifies the grid, locates and classifies the letters, creates the board and passes it into the solver.
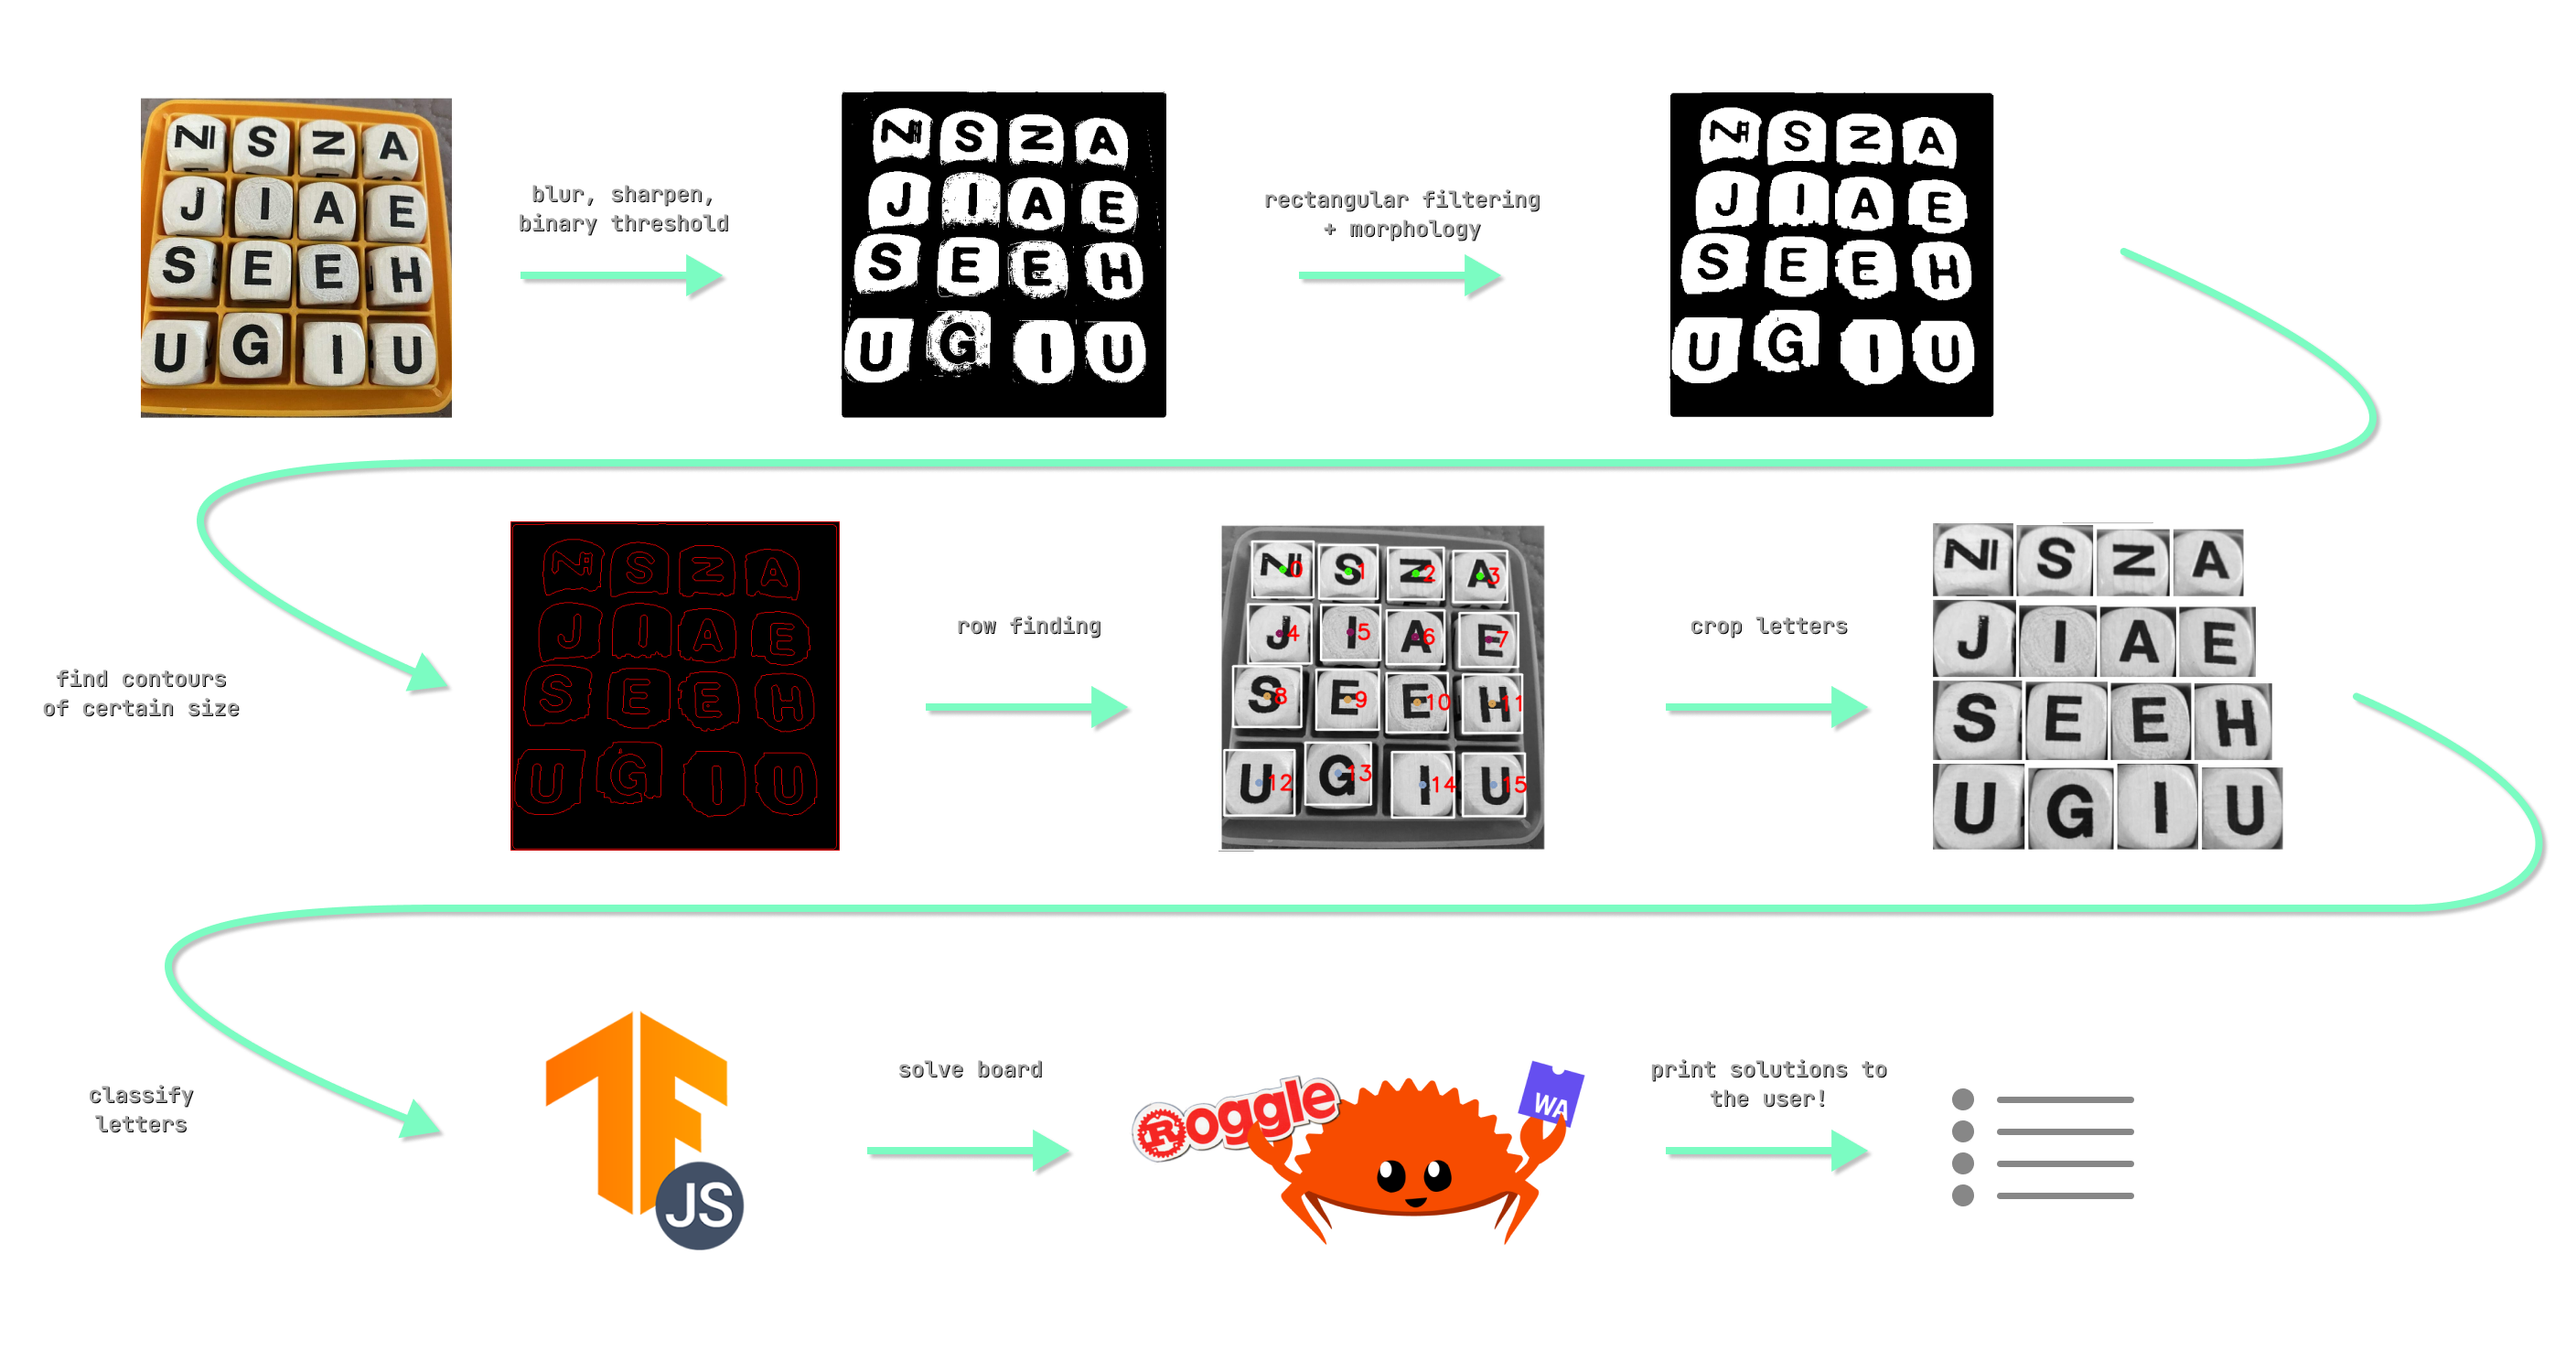
Here are the steps in more detail:
- The image is grayscaled, blurred, then sharpened to enhance the edges, and lastly a binary threshold is applied to obtain a black and white image.
- A rectangular morphological transformation is applied to remove extra noise and enhance the rectangular contours.
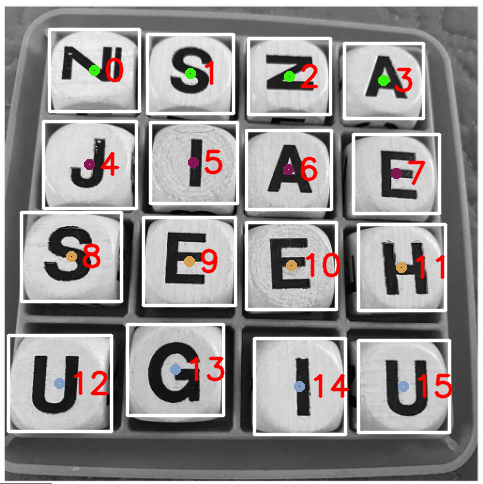
- Next we find contours and filter using a minimum/maximum threshold area. Any contours that pass will be our letter squares. A rectangular bounding box can be applied on the contour to get our letter/Region Of Interest (ROI) which we can crop later to be classified.
- The row finding algorithm attempts to sort our letters into the appropriate, ordered grid that we as humans can understand just by looking. Otherwise, we would just have a list of unordered letters which we wouldn’t know how to construct into a board to be solved.
- The rectangular bounding boxes found earlier are used to crop our image into each different letter block.
- Each cropped image is passed into our letter classifier model in order and classified.
- From the predictions of the model, we can construct a string of the letters representing the board. We we can then pass this board into our solver program.
- The solver produces a list of words which the board contains and we can then print this list of words (plus how many points each is worth) to the user!
Now let’s take a look at each step in detail and how I arrived there.
Setup
Before we jump right into how we process our images and solve the board, all three CPU-intensive WebAssembly-based aspects of this project need to be called by our web app in some way or another. In this project I decided to use SvelteKit, a JavaScript framework that makes building production Web Apps easier.
One feature I wanted to include on the site was the ability to run the solver and image processing code from within a Web Worker. Running CPU intensive tasks is an ideal job for Web Workers since they don’t block the main CPU thread responsible for keeping the UI of the website responsive.
I found a fantastic post from Aral Roca on How to Run OpenCV in the Browser Using WASM + Web Workers. By following his blog I was able to get OpenCV.js and TensorFlow.js and my custom WASM module working when called from a Svelte component! Let’s see how it works:
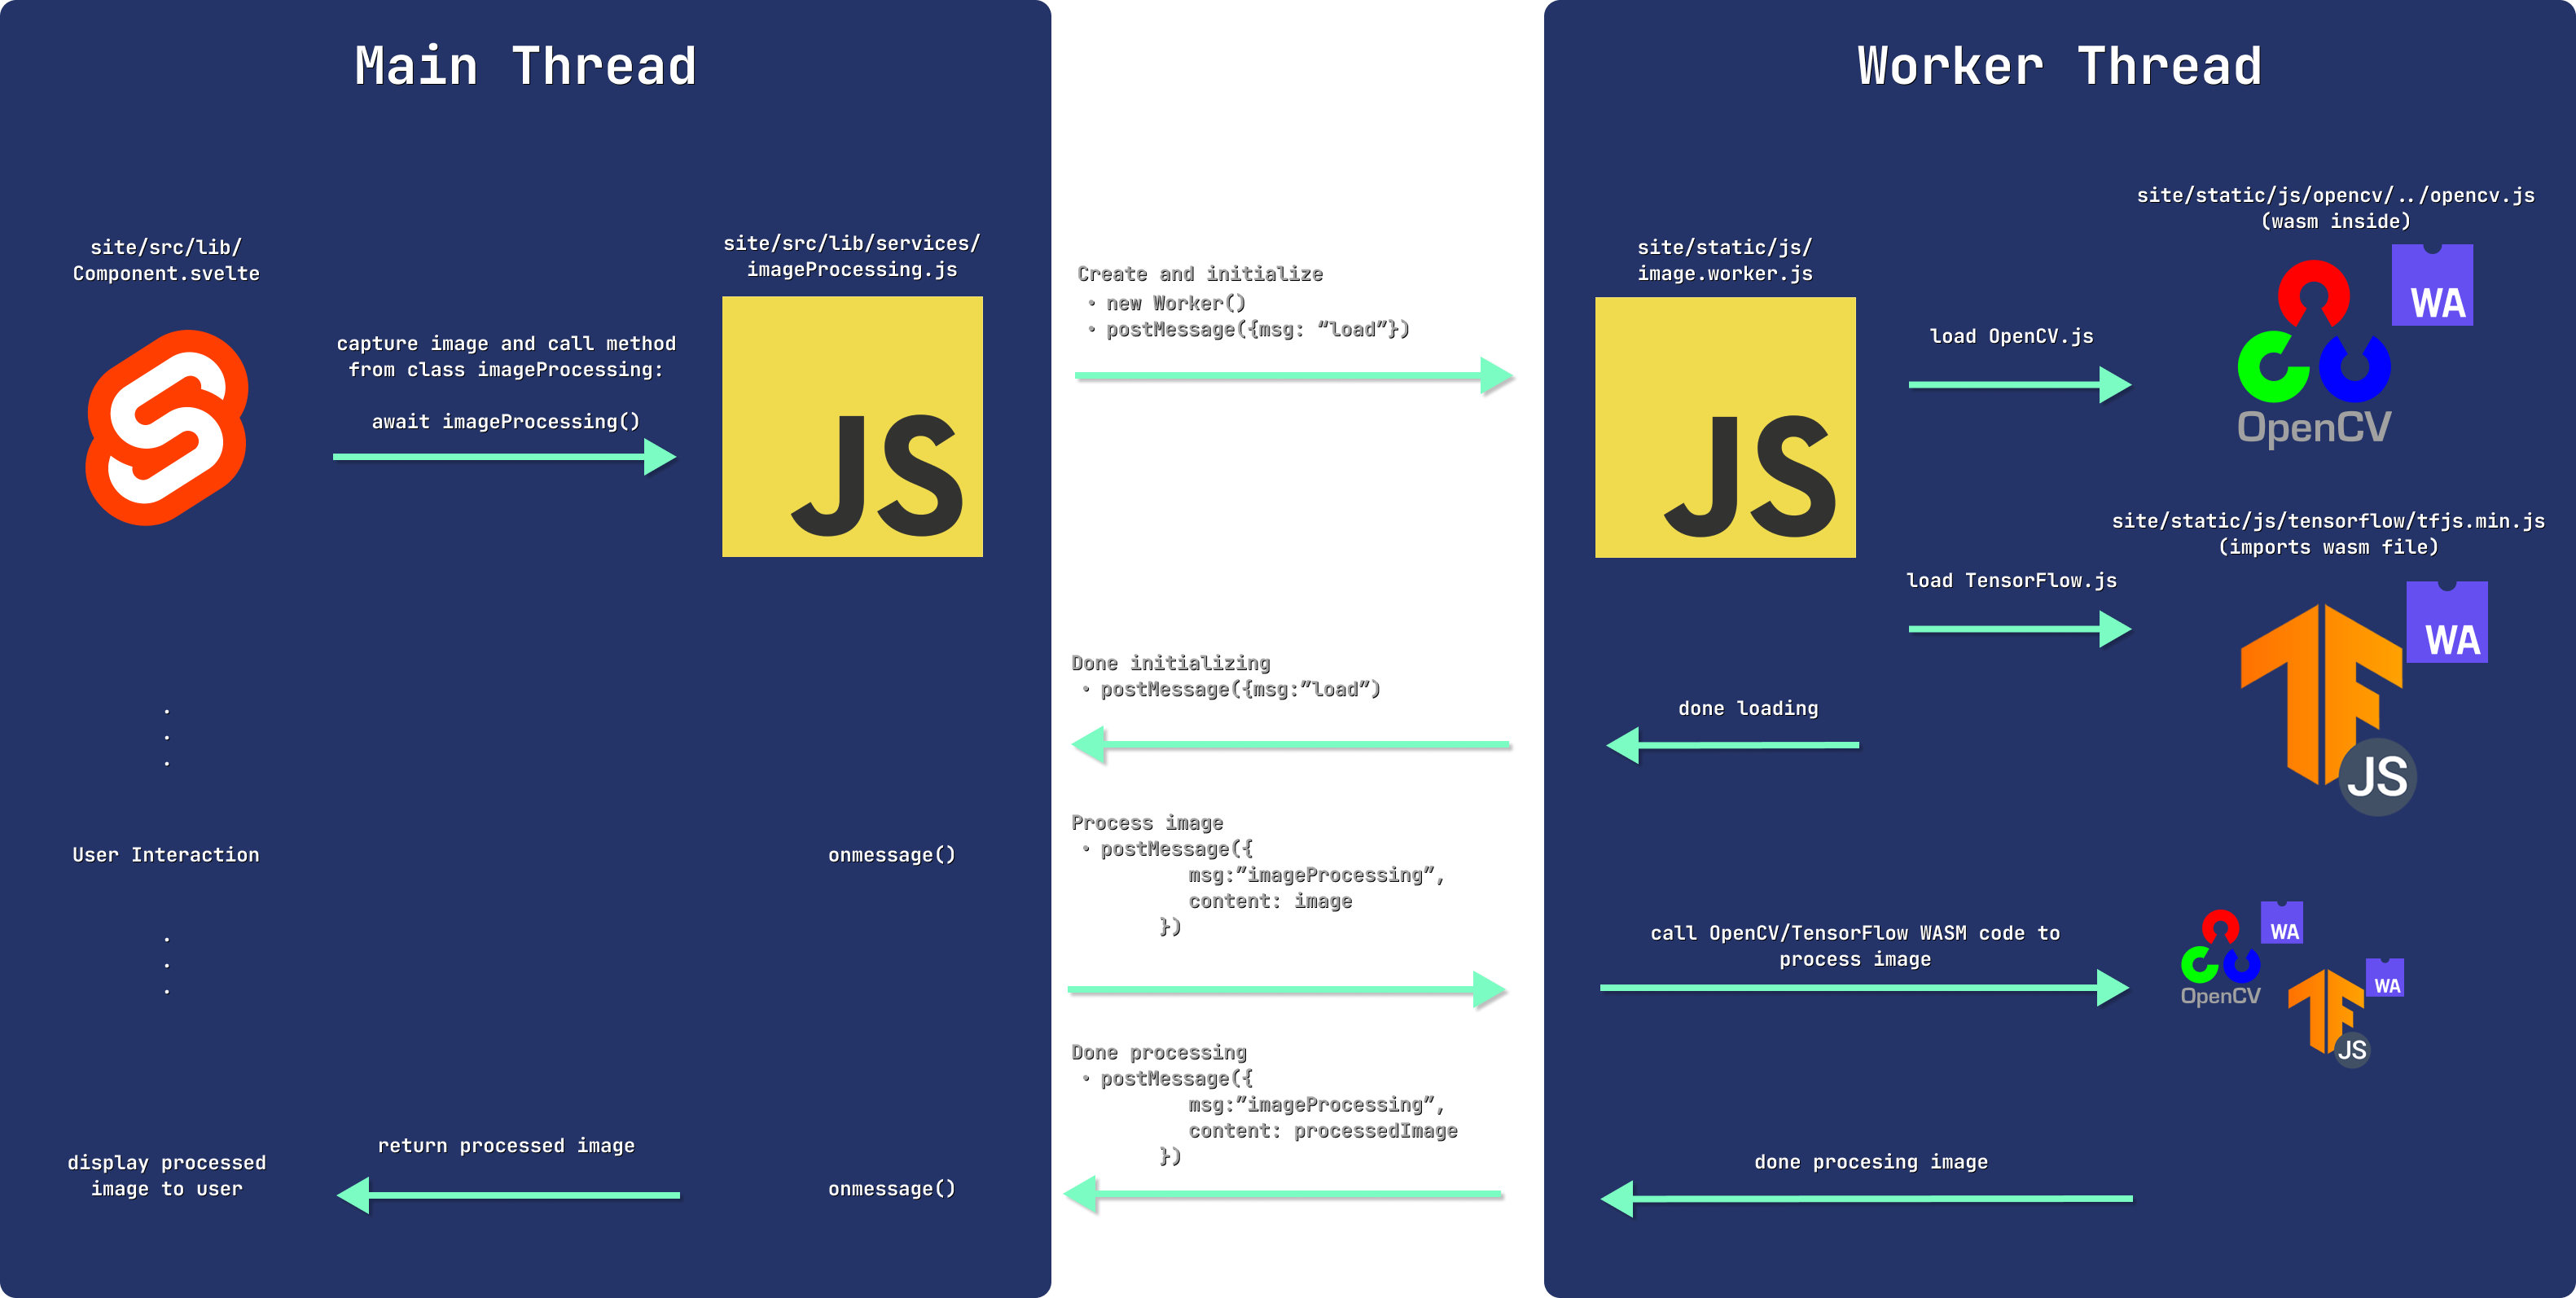
You will see later how we can use the same process to call our Boggle solving Web Assembly module. By offloading the CPU-intensive image processing work to the WebWorkers, it frees up our main thread for user interaction on the site! No more freezing buttons and animations, providing a much better user experience.
Note: The reason we place the x.worker.js files in the static folder is because SvelteKit (or more specifically its build tool — Vite) will try and bundle our code if its within the source folder. We want to run just the raw JS script without any Vite bundling/minifications.
Now that we have a decent understanding of how Web Assembly-based tools can be used in the browser through web workers, let’s get into the actual computer vision techniques needed to extract and predict the letters on the game board.
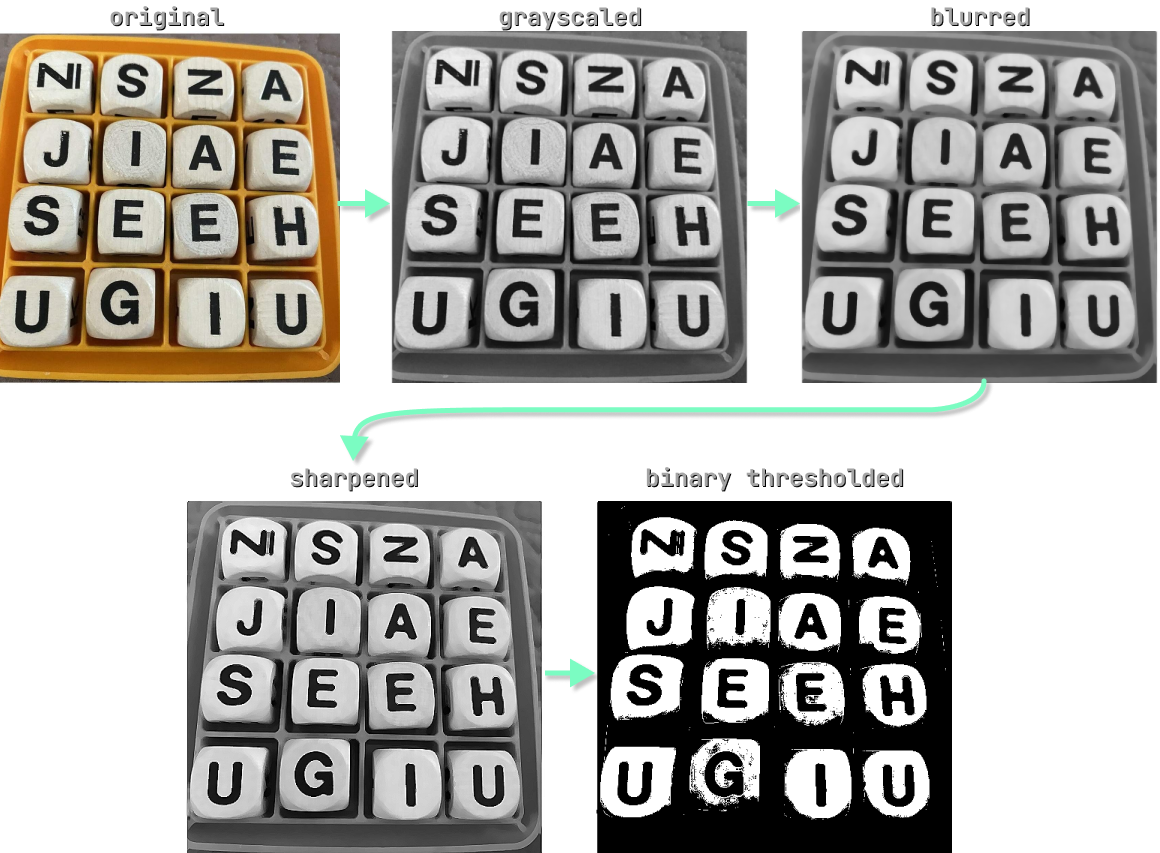
Blurring, Sharpening, Thresholding
This step aims to prepare our image for further processing. The blurring and sharpening step helps remove extra noise and enhance edges. Lastly, we binary threshold the image which will help us identify contours later on.
Code
// site/static/js/image.worker.js

//...
function imageProcessing({ msg, data }) {
  const img = cv.matFromImageData(data); // convert the ImageData object into an opencv matrix

  // ========================== THRESHOLDING + FILTERING ==========================
  cv.cvtColor(img, img, cv.COLOR_BGR2GRAY); // convert to grayscale and save copies for later
  const originalGrayscaleImg = img.clone();
  const workingImg = img.clone();

  // blur then sharpen to enhance edges
  cv.medianBlur(img, img, 7);
  const sharpeningKernel = cv.matFromArray(3, 3, cv.CV_32FC1, [0, -1, 0, -1, 5, -1, 0, -1, 0]); // https://en.wikipedia.org/wiki/Kernel_(image_processing)#Details
  cv.filter2D(img, img, -1, sharpeningKernel);

  // binary threshold the image to get extremes
  cv.threshold(img, img, 190, 255, cv.THRESH_BINARY);

//...
}
//...
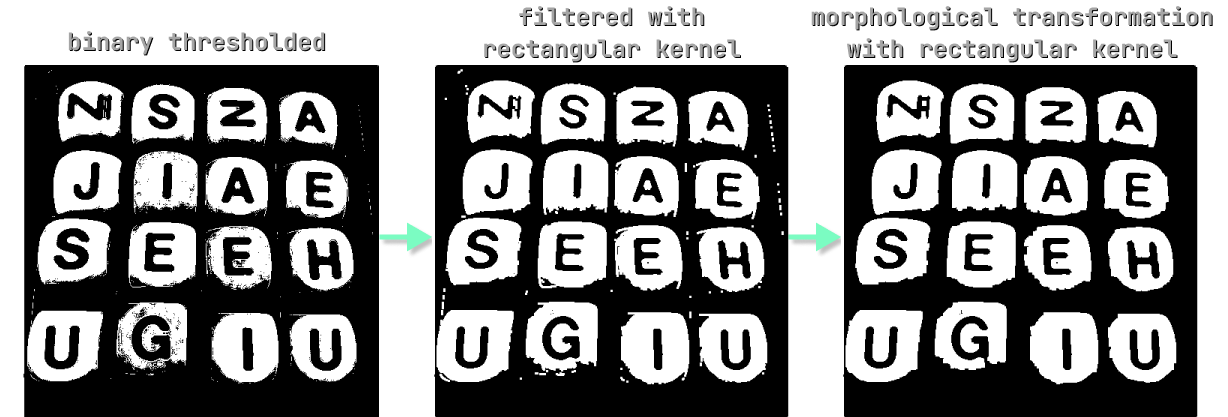
Rectangular Filtering and Morphological Transformation
As you can see in the binary thresholded image, there is still some noise which could make finding contours more difficult. One way to reduce this noise and further enhance our square edges is using filtering and morphological transformations with a rectangular kernel.
Code
// site/static/js/image.worker.js

//...
// use rectangular morphology to filter out extra tidbits / small unwanted thresholded pieces
const rectangularKernel = cv.getStructuringElement(cv.MORPH_RECT, new cv.Size(3, 3));
cv.filter2D(img, img, -1, rectangularKernel);
cv.morphologyEx(img, img, cv.MORPH_OPEN, rectangularKernel, new cv.Point(-1, 1), 2);
//...
Contours
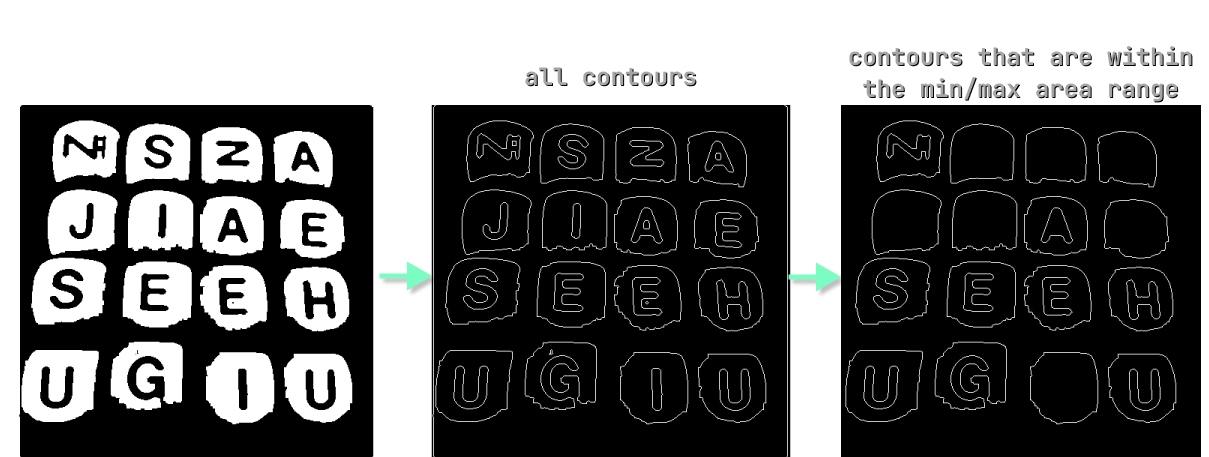
Next we need to find contours within the image. Using OpenCV’s findContours() function, its easy to do exactly that! Since our previous processing isn’t perfect, the findContours() function will end up identifying contours that aren’t important to identifying the letter blocks.
We need to filter out contours that are far too large (the whole board, for example) and contours that are too small (little bits of noise that slipped past us earlier). Using some trial and error, I found that any contour with an area of 20000 pixels is far larger than any letter block should be, and an area of 1000 was far too small. From here we can easily filter out contours based on these areas:
Code
// site/static/js/image.worker.js

//...
// ========================== CONTOURS ==========================
const contours = new cv.MatVector();
const hierarchy = new cv.Mat();
const contourImgBuffer = cv.Mat.zeros(img.rows, img.cols, cv.CV_8UC3);
const color = new cv.Scalar(255, 0, 0);

const minArea = 1000; // lower bound on acceptable contour areas (this is very small)
const maxArea = 20000; // upper bound on acceptable contour areas (this is huge, bigger than any letter block should be)
const contourData = []; // array to hold an object containing a contour, its area, and its bounding rectangle


// find all contours in the image
cv.findContours(img, contours, hierarchy, cv.RETR_CCOMP, cv.CHAIN_APPROX_SIMPLE);

// get all contours and contour areas areas and add them to an array
for (let i = 0; i < contours.size(); i++) {
  // draw ALL contours
  cv.drawContours(contourImgBuffer, contours, i, color, 1, cv.LINE_8, hierarchy, 0);

  const contour = contours.get(i);
  const area = cv.contourArea(contour);

  // if within an acceptable area, save the contour and its area to an object and add it to the list of contours we think are decent enough to continue with
  if (area > minArea && area < maxArea) {
    contourData.push({
      contour,
      area,
    });
  }
}
//...
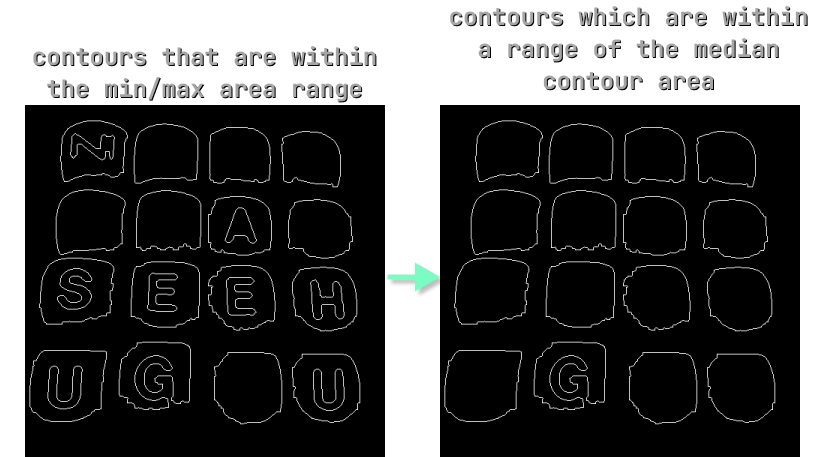
Median Contour Filtering
Now you’ll notice that we still have the letters within the outer letter blocks that are identified as contours. We only want the outer letter block contours so we can get the bounding box of each, and crop the whole letter block. I couldn’t find a happy medium of min/max areas to filter between my test images that gave consistent results. Instead I came up with the idea of filtering out contours that aren’t within a certain range of the median contour area. In theory, this should extract just the contours that are all approximately the same size, determined on an image-by-image basis.
Code
// site/static/js/image.worker.js

//...
const letterAreaDeviation = 3000; // acceptable range above and below median area of a letter contour
const letterData = []; // array to hold on object containing a letter block's midpoint point and it's bounding box

// sort the contours by area and find the median value. we will use the median plus a range to try to filter out outlier contours
contourData.sort((c1, c2) => c1.area - c2.area);
const medianArea = median(contourData.map((c) => c.area));

// loop over each contour and attempt to find the ones that are within an acceptable range of the median value
contourData.forEach((contour) => {
  // only keep contours within a certain area range of the median
  if (
    contour.area < medianArea + letterAreaDeviation &&
    contour.area > medianArea - letterAreaDeviation
  ) {
    const boundingRect = cv.boundingRect(contour.contour);
    const rectTopLeftX = boundingRect.x;
    const rectTopLeftY = boundingRect.y;

    letterData.push({
      x: Math.floor(rectTopLeftX + boundingRect.width / 2),
      y: Math.floor(rectTopLeftY + boundingRect.height / 2),
      boundingBox: {
        x: rectTopLeftX,
        y: rectTopLeftY,
        width: boundingRect.width,
        height: boundingRect.height,
      },
    });

  }
});
In the above code snippet you can see I sort our contours by area, and find the median area value using a median function. Then for each contour, I only keep the ones that are within a range of +/- 3000 pixels of the median, a number which I found through experimenting with a couple Boggle board images. From here, I store the bounding box of these good contours to use for later This ended up producing decent results:
So now that we have all our letter blocks, can’t we just pass in the cropped versions of these into our AI to determine the letters? Not quite. Let’s see why:
Currently our contours are sorted by area, but we need them sorted left-to-right, top-to-bottom for our Boggle solving program later on. Let’s see how we can do that.
Row Finding Algorithm
While searching for ways to sort our contours in a grid I came across a 2016 paper from Yu Liu et al. about Automatic chessboard corner detection. The paper outlines a simple method for determining proper row order of a grid. The steps are as follows:
- Sort midpoints of all contours in ascending order by the sum of their x and y coordinates
- Find top left point: first point in sum sorted array
- Sort midpoints of all contours in ascending order by the difference of their x and y coordinates
- Find top right point: last point in diff sorted array
- Draw a line between the top left and right
- Calculate distance of all remaining points to the line
- If it is smaller than a given threshold, the point is in the top row.
- Otherwise, the point isn’t in the row and must be searched again later
- Sort points of the top line by x value (to get left-to-right) and save for later
- Repeat until there are no more points to search
Code
// site/static/js/image.worker.js

//...
// ========================== ROW FINDING ALGORITHM ==========================
let pointsToSearch = letterData; // copy over the data from earlier
let sortedPoints = [];
let maxRowSize = null;

while (pointsToSearch.length > 0) {
  const boundingPointsSum = pointsToSearch
    .map((pt) => ({ x: pt.x, y: pt.y, sum: pt.x + pt.y }))
    .sort((a, b) => a.sum - b.sum);

  const boundingPointsDiff = pointsToSearch
    .map((pt) => ({ x: pt.x, y: pt.y, diff: pt.x - pt.y }))
    .sort((a, b) => a.diff - b.diff);

  const lastIdx = pointsToSearch.length - 1;
  const topLeft = new cv.Point(boundingPointsSum[0].x, boundingPointsSum[0].y);
  const topRight = new cv.Point(boundingPointsDiff[lastIdx].x, boundingPointsDiff[lastIdx].y);

  const pointsInRow = [];
  const remainingPointsToSearch = [];

  pointsToSearch.forEach((pt) => {
    const distance = distanceFromLine(topLeft, topRight, pt);

    if (distance < 50) {
      pointsInRow.push(pt);
    } else {
      remainingPointsToSearch.push(pt);
    }
  });

  // row size validation
  if (maxRowSize === null) {
    // first run through, need to set an inital row size
    maxRowSize = pointsInRow.length;
  } else if (pointsInRow.length !== maxRowSize) {
    // subsequent run throughs, if the row sizes don't match we can't continue (we need an NxM board here folks!!!)
    postMessage({
      msg,
      payload: "Error: Could not extract an NxM board from image",
    });
    return;
  }

  // reset the points to search to only be the ones that weren't found to be in the current row
  pointsToSearch = remainingPointsToSearch;

  // add the items found in the row sorted by x to the overall sorted points array
  sortedPoints.push(...pointsInRow.sort((pt1, pt2) => pt1.x - pt2.x));
}
In the images below you can see our program is able to determine the first row using a line between the top left and right points. Any points that fall outside of 40 pixels of the line don’t count as part of the row. The 40 pixels threshold is another one I found using trial-and-error.
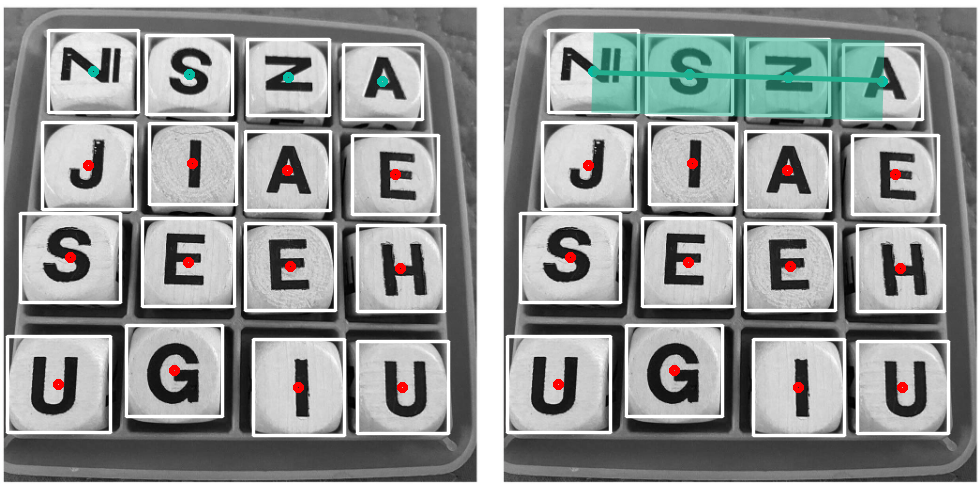
Repeating this algorithm on each midpoint results in having our grid properly sorted and ready to go!
Crop Letters
Now that we have a list of the letters and their bounding boxes in order, we can simply crop the letter from the image using the roi function from OpenCV.
// site/static/js/image.worker.js

//...
const lettersCropped = [];
const IMG_SIZE = 48;
const IMG_AREA = IMG_SIZE * IMG_SIZE;

sortedPoints.forEach((pt) => {
    const boundingRect = new cv.Rect(
      pt.boundingBox.x,
      pt.boundingBox.y,
      pt.boundingBox.width,
      pt.boundingBox.height,
    );

    // crop letter and resize them all to the same size
    const roi = originalGrayscaleImg.roi(boundingRect);
    cv.resize(roi, roi, new cv.Size(IMG_SIZE, IMG_SIZE), 0, 0, cv.INTER_AREA);
    lettersCropped.push(roi);
});
//...
Here you can see we’re actually cropping from the original grayscale image. Since our letter classifier will be trained on cropped grayscale images of Boggle letters, we want these instead of our heavily blurred/sharpened/thresholded version of the Boggle board.
Letter Classification
Now that we have our sorted array of cropped letters, we can pass these into a letter classifier to predict what letter each image represents. To make the letter classifier I used TensorFlow — a machine learning library that allows us to train and test models, which I can later run in the browser using TensorFlow.js. While it is possible to create a training pipeline using TensorFlow.js directly, I chose to use Python due to the better documentation of Python’s TensorFlow API, in addition to the tooling and visualization offered by Jupyter Notebooks.
Check out this folder in the repo to see where all of the model training was performed.
Dataset
In order to train the letter classifier model, I needed a dataset of thousands of images of Boggle letter tiles. Since Boggle has a unique font and styling to it’s letters, I wanted to train the model on actual Boggle data rather than some general letters from a dataset such as EMNIST. I was lucky enough to find a dataset of pre-labelled Boggle boards which saved me a TON of time labelling them myself. These images contain multiple labelled letters, so in order to create training data from this I needed extract the cropped letters and place them into a folder in the training directory depending on their class. For example, if an image had an A tile, I needed to:
- get the bounding box from the labels
.csvfile - crop the image
- find the classification given to the image from the
.csvfile - save the cropped A tile image to the
./train/a/directory - repeat steps 1-4 for every letter classified in the dataset
I did this using this Python script.
Model Structure
Image classifier models often use what is called a Convolutional Neural Network (CNN). This article from Towards Data Science sums up what a CNN is and why we would want to use one quite nicely,
A Convolutional Neural Network (ConvNet/CNN) is a Deep Learning algorithm which can take in an input image, assign importance (learnable weights and biases) to various aspects/objects in the image and be able to differentiate one from the other.
One advantage CNNs have over just inputting an entire image into a model is that they are able to reduce the image into a form which is easier to process, while maintaining temporal and spatial characteristics which are crucial for generating a generalizable prediction. My model uses a slightly modified version of Bryan B’s CNN for Handwritten Letter Classification. Using an already proven model structure for a similar task helped save me time testing my own custom model structures. The model structure and extra tooling around training (Early Stopping, Reducing Learning Rate, etc.) are all used/modified from Bryan B’s training notebook linked above.
The structure of the model is visualized below:
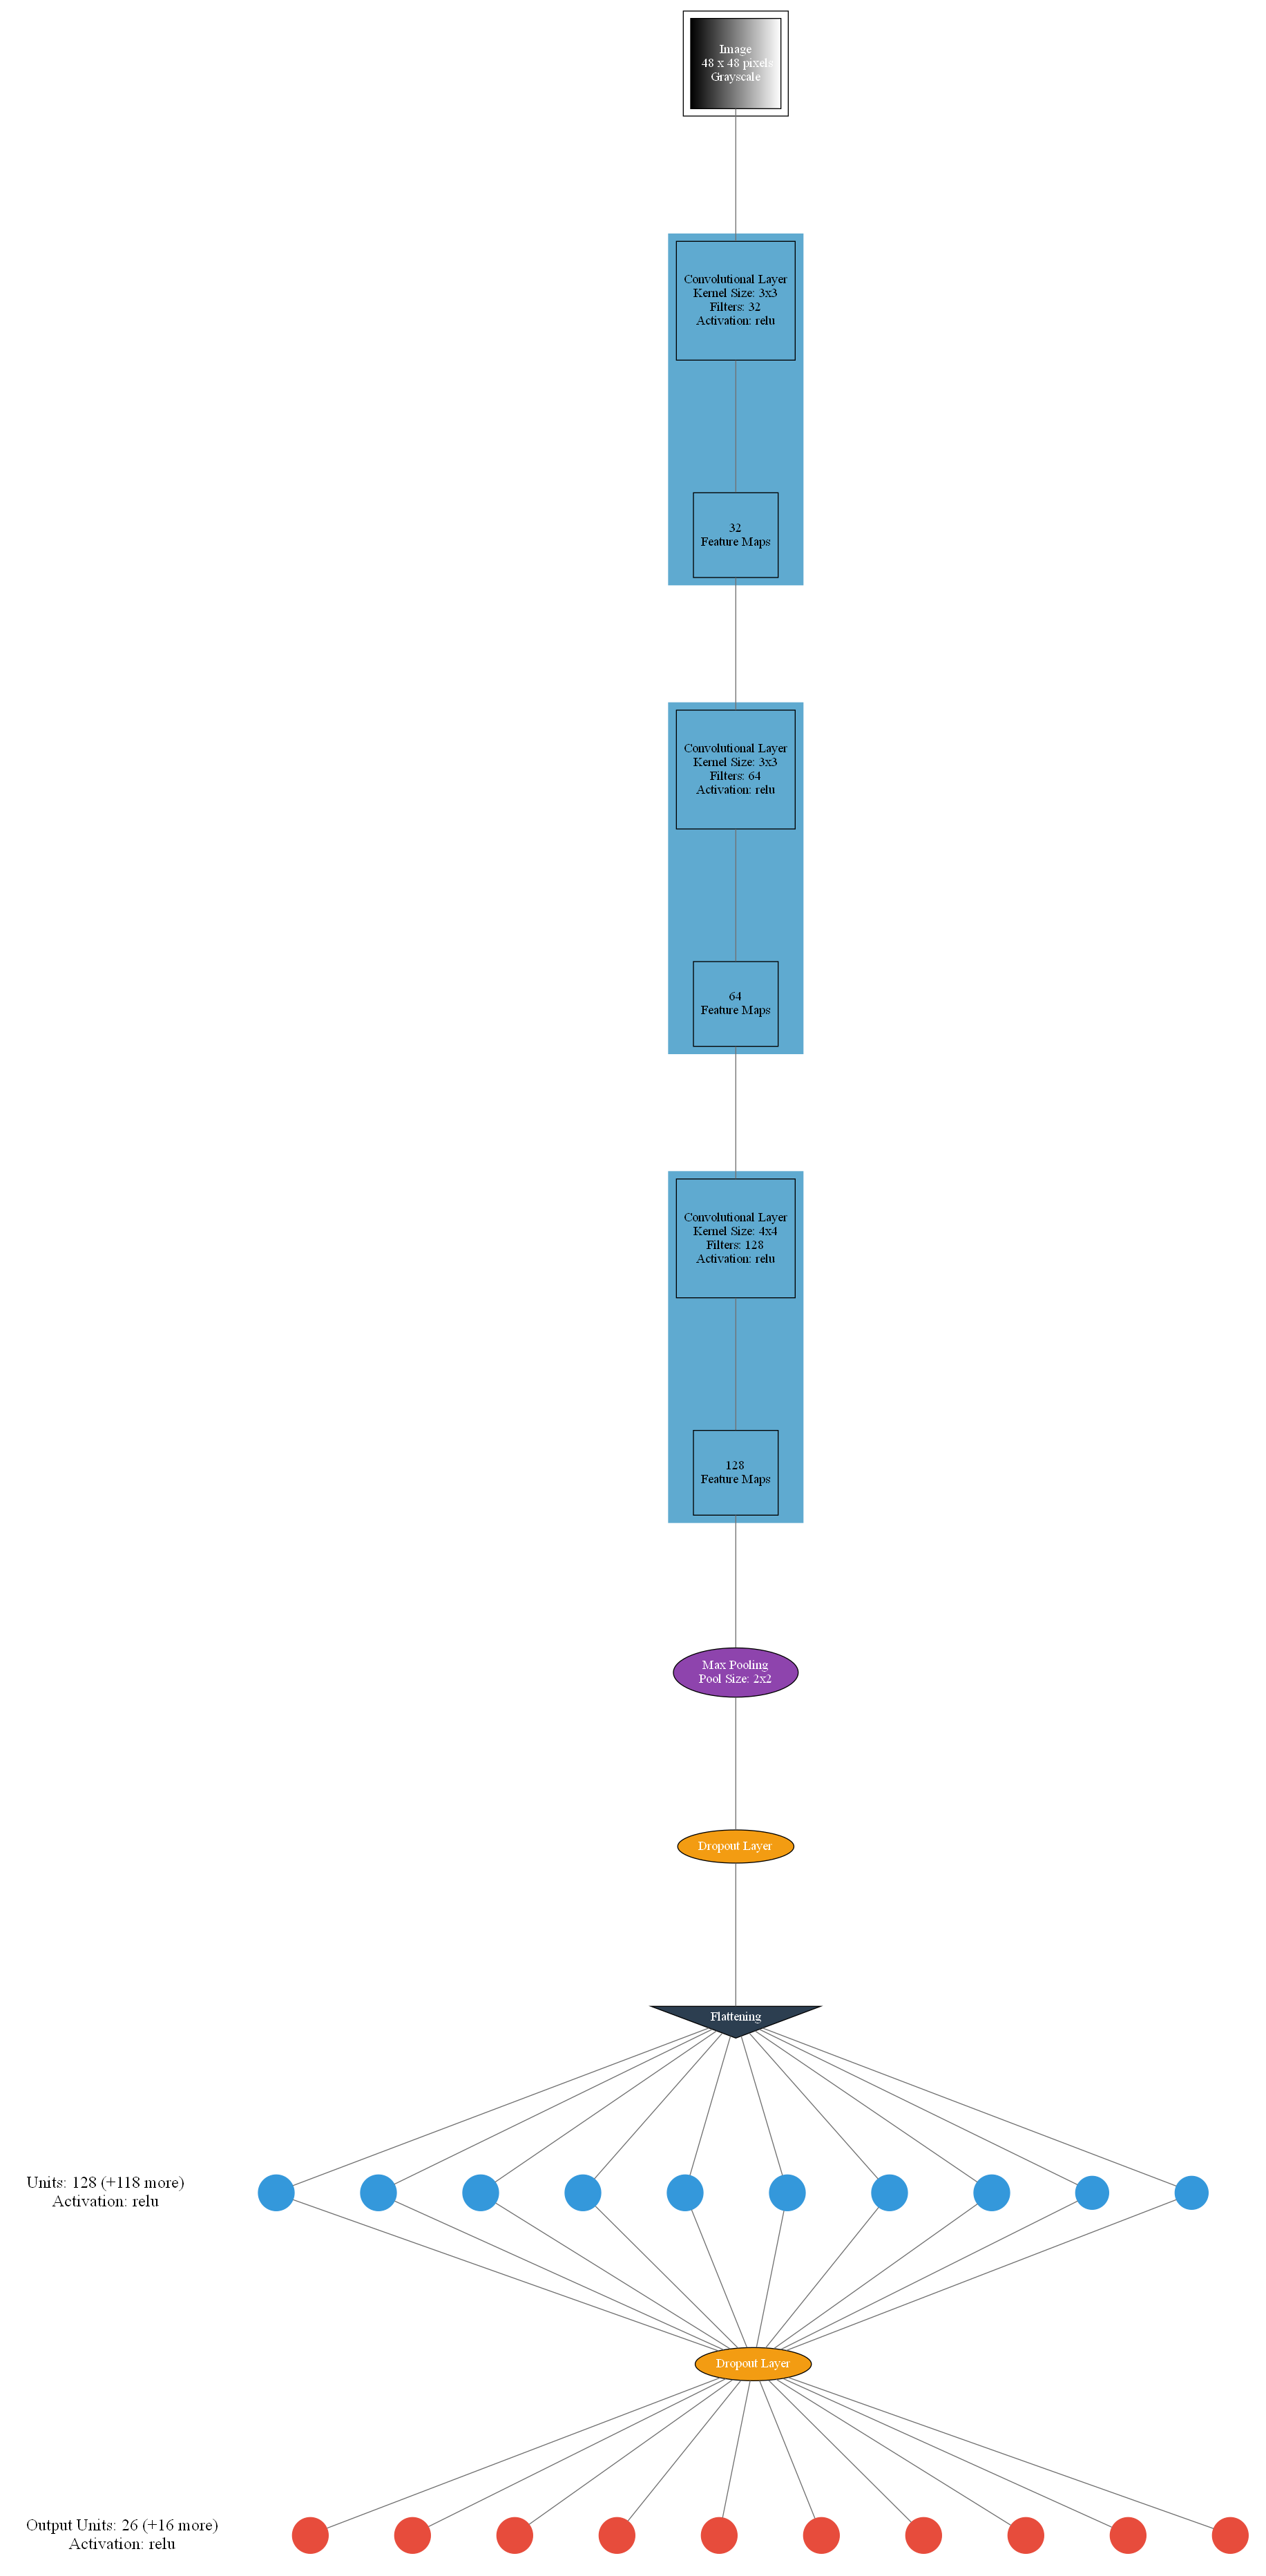
As you can see by the end, the model produces 26 outputs. Each output unit represents the confidence the model has of the image containing the corresponding letter. For example if the first node had a value of 0.82, that would mean the model believed the image to have a letter A with 80% confidence.
Training
Training the model took a lot of trial and error to try and get it to an acceptable level of classifying the images accurately. Before landing on Bryan B’s CNN architecture, I tried creating my own, using ones from TensorFlow tutorials, other people’s projects, etc. But after multiple training sessions I found Bryan B’s model to produce the best baseline results of around 60% accuracy on our test dataset. However, this wasn’t an acceptable level of accuracy for what most would call a simple classification problem.
Overfitting Pains
During training I ran into issues with overfitting. Overfitting is when a model begins to learn and memorize the training dataset, and as a result, performs poorly on new, unseen data. For more information on overfitting, check out MachineLearningMastery.com’s blog post on How To Avoid Overfitting. After many training attempts with different CNN structures, I still kept running into the issue of my training accuracy reaching over 90%, meanwhile my validation accuracy stagnating at around 60%. Clearly my model had started memorizing the training data.
There were multiple key takeaways from the blog post that could help with my overfitting problem:
- Early Stopping — stopping the training process if the model fails to improve on the validation set ensures the model doesn’t just continue to overfit more
- Reduce Learning Rate on Plateau — reducing the learning rate if the model starts to plateau can encourage smaller incremental gains and squeeze out the best performance near the end of the training process
- Regularization (dropout layers and weight decay) — taking measures to ensure a large model doesn’t tune itself to just learn the training dataset can help the model work on generalizing itself to work on unseen data
A general rule of thumb:
… in practical deep learning scenarios, we almost always do find—that the best fitting model (in the sense of minimizing generalization error) is a large model that has been regularized appropriately.
~ Page 229, Deep Learning, 2016.
Early Stopping
Using Bryan B’s training notebook, he made it quite easy to implement early stopping in my training pipeline.
# letter_classifier/train_classifier.ipynb

# ...
# If score doesn't improve, stop learning
estopping = EarlyStopping(monitor='val_loss',
                          patience=5,
                          verbose=2)
# ...
The code above adds an Early Stopping mechanism which will stop the model training if the validation loss doesn’t improve over the span of 5 epochs.
Reduce Learning Rate on Plateau
Ditto from above, the following lines implement a feature which reduces the rate at which the model tries to learn if validation loss hasn’t improved over the span of 4 epochs.
# letter_classifier/train_classifier.ipynb

# ...
# Reduce learning rate when a metric has stopped improving
lr_reduction = ReduceLROnPlateau(monitor='val_loss',
                                 patience=4,
                                 verbose=2,
                                 factor=.75)
# ...
Regularization
Taking a look at some regularization methods for Convolutional Neural Networks, I came across a 2012 paper from Geoffrey Hinton et al. at the University of Toronto where they trained their classification CNN with an L2,
…weight decay of 0.0005. We found that this small amount of weight decay was important for the model to learn. In other words, weight decay here is not merely a regularizer: it reduces the model’s training error.
~ Page 6, ImageNet Classification with Deep Convolutional Neural Networks, 2012.
After reading I decided to use an L2 weight decay of 0.0005 in my convolution and dense layers as a starting point to regularize my model. After multiple training sessions I was able to fine-tune this parameter to 0.0008, which seemed to be the furthest I could get in terms of validation accuracy. The following lines show how L2 weight decay can be added to a Keras Convolution layer:
layers.Conv2D(
    64,
    (3, 3),
    activation = "relu",
    kernel_regularizer=tf.keras.regularizers.L1L2(l1=0, l2=0.0008),
    bias_regularizer=tf.keras.regularizers.L1L2(l1=0, l2=0.0008)
  ),
Results
While there is still room for improvement, here are the final results for my model training:
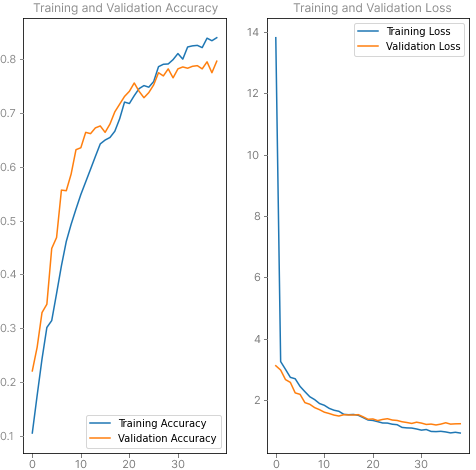
Any guidance on how I could possibly improve this would be really appreciated!
Exporting to TensorFlow.js Format
TensorFlow.js requires a certain format for models. The Keras .hdf5 format used in Python won’t work from directly inside TFJS and instead needs to be converted. The new format consists of a model.json file along with a binary containing the model weights. The binary file is split up into multiple shards to maintain small file sizes. The following snippet of Python code allows us to easily convert our Keras model into one understandable by TFJS:
# letter_classifier/train_classifier.ipynb

import tensorflowjs as tfjs

tfjs.converters.save_keras_model(model, "./model_tfjs")
This generates a folder structure similar to the following:
letter_classifier
|
└─── model_tfjs/
│   │    group1-shard1ofX.bin
│   │    group1-shard2ofX.bin
│   │    group1-shard3ofX.bin
│   │    group1-shard4ofX.bin
│   │    ...
│   └─── model.json
...
Usage
Copying the files generated by the above code into the /static/ folder of our site will allow us to easily load it from TFJS:
// site/static/js/image.worker.js

model = await tf.loadLayersModel("./tensorflow/model/model.json");
In order to predict on our image data from TFJS, we need to convert our letter image data from OpenCV’s image type into a tensor. The following code snippet will generate a tensor containing all of our image data and make a prediction using that tensor. From there we can extract the highest confidence guess for each image and construct our game board string!
// site/static/js/image.worker.js

// ... rest of image processing code
// ========================== PREDICTION ==========================
const TOTAL_LETTERS = lettersCropped.length;
const inputTensorArr = new Float32Array(
  IMG_AREA * TOTAL_LETTERS
);

// insert the raw opencv image data into the new Float32Array we made
lettersCropped.forEach((croppedLetter, i) => {
  inputTensorArr.set(croppedLetter.data, i * IMG_AREA);
})

const testTensor = tf.tensor2d(inputTensorArr, [TOTAL_LETTERS, IMG_AREA]);
const reshaped = testTensor.reshape([TOTAL_LETTERS, IMG_SIZE, IMG_SIZE, 1]);

const predictions = model.predict(reshaped).dataSync();

let predictedBoard = "";
for (let i = 0; i < TOTAL_LETTERS; i++) {
  const letterPredictionsArr = Array.from(predictions).slice(i * 26, i * 26 + 26);
  const mostLikelyLetter = Math.max(...letterPredictionsArr);
  const letterIndex = letterPredictionsArr.indexOf(mostLikelyLetter);
  predictedBoard += CLASSES[letterIndex];

  // if we are at the end of a row, add a space to indicate a new row in the board
  if ((i + 1) % maxRowSize === 0) {
    predictedBoard += " ";
  }
}

// by now, predictedBoard should look something like "abcd efgh ijlm opqr" for a 4x4 board for example
Solving Boggle
Now that we have our boggle board extracted from an image we need to actually solve it!
Solving Boggle is a classic programming problem used in interviews and as University Projects, so programmatic solutions to the problem are well known. Rather than using an existing program made by somebody I wanted to try my hand at implementing one in Rust. Before starting this project I had been very interested in trying to learn and use Rust in a project, so this would be a perfect opportunity!
Rust
Rust is an exciting programming language bringing the promise of the crazy fast performance of C, without the memory leaks and pointer nonsense of C. In addition, the Rust language has first-class tools for compiling the language into WebAssembly using the wasm-pack crate. This means we can not only publish our Rust boggle solver as a crate to crates.io, but also publish the WASM version as a package on npm!
The method I found most useful for learning Rust was by reading through the fantastic Rust Book (its not a physical book, just a free site!) and practicing the concepts from the book using exercises from Rustlings — an open source project from the awesome Rust community.
The Rules
The game of Boggle begins with a randomized NxM (usually 4x4 or 5x5) grid of letters. A timer is set for 3 minutes, and each player (usually 2 or more) will compete to create the most words by chaining letters together with the following restrictions:
- the letters must connect by being within the 8 blocks around (up, down, left, right and the 4 diagonals)
- any word you create must be 3 or more characters long
- you cannot re-use the same letter block in a word
- the words you create can be in any direction (left-to-right? bottom-to-top? all valid.)
- you can only count each word once. even if you can spell
dogthree different ways, it only counts once - words-within-words are chill: if you can create the word
apple, then the wordappis also valid - any word in the dictionary is fair game (though feel free to debate with your friends what’s reasonable or not)
- acronyms (e.g. M.A.D.D.) and proper nouns (e.g. Parker) are generally not allowed
Writing the Solving Algorithm
The goal of this program is to take an input NxM Boggle board and output an array of all the possible words that could be created in the board. The board will be passed as a string, with rows separated by spaces. For example the following board:
a h i o
e h k m
r s t l
f j k o
would be inputted as: ahio ehkm rstl fjko.
I started with a new struct called Board which contains fields for the board’s values, and it’s width & height.
// crate/src/board.rs

pub struct Board {
  values: Vec<Vec<char>>,
  width: i16,
  height: i16,
}
Trie
Next I took a look at different solutions for Boggle and found that many were using a data structure called a Trie, pronounced “tree” but I go with “try” so I don’t confuse myself! A Trie is a tree (see?) that allows for quick lookup using prefixes. Rather than taking our current list of characters and needing to check if it exists in the dictionary in full, a Trie allows us to see if the characters we have exist as a prefix for any word in a dictionary. This gives us the ability to exit a search early so we don’t waste our time trying to find a word that could never exist.
Let’s say I have a dictionary consisting of the words [”angel”, “angry”, “ant”]. To construct our Trie we first start with our empty root node, and for each word in the dictionary we insert it’s characters into the tree. If we reach the end of the word, we can therefore mark that node as a “full word.” This is what inserting our dictionary into the Trie would look like:
Now just imagine doing that for the entire English dictionary!
Here’s a snippet of my implementation of a Trie in Rust:
// crate/src/trie.rs

//...
#[derive(Debug)]
pub struct Trie {
  root_node: TrieNode,
}

//...

#[derive(Debug)]
pub struct TrieNode {
  value: Option<char>,
  is_word: bool,
  children: HashMap<char, TrieNode>,
}

//...

impl Trie {
  //...

  pub fn find(&mut self, value: &str, is_word: &mut bool) -> bool {
    let chars: Vec<char> = value.chars().collect();
    let mut current_node = &mut self.root_node;

    for i in 0..chars.len() {
      if !current_node.children.contains_key(&chars[i]) {
        return false; // if the node's children don't contain the char we need, then it can't possibly contain the whole word
      } else {
        current_node = current_node.children.get_mut(&chars[i]).unwrap();
      }
    }

    if current_node.is_word {
      *is_word = true;
    }

    // if we've gone through the Trie and found every character of the word, then the Trie contains the word
    return true;
  }
}
As you can see our Trie really only needs a field for it’s root_node, which is a TrieNode struct, in addition to a find method, the insert methods are omitted from here just to save space.
Our TrieNode struct does all the heavy lifting, it has the following fields:
value— Holds the character of the node, rather than entire string. The type is anOption(either it has a char, or no value in the case of the root node). And shhh don’t tell anyone, this value is actually never used 😱😱😱, since we traverse the Trie using the key value pairs of the nodeschildrenHashMap, we don’t never end up reading the value anywayis_word— Boolean which tells whether or not this node marks the end of a full wordchildren— aHashMapwith chars as keys, andTrieNodesas the values. this allows us to check, “is there ananext?” if so, traverse to it, if not insert it into the Trie
The Qu Tile
In Boggle there is no q tile on its own, Boggle instead uses a tile with Qu on it. Since our code relies on single characters for each tile how can we handle that? Luckily it isn’t too much work!
When we insert our dictionary into our Trie, we must do the following:
- Since boggle doesn’t have
qon its own, we need to omit any word in the dictionary with aqnot followed by au(e.g. the word “burqa” is not a valid English Boggle word!) - Replace any instance of
quin a word withq.
Since we control the dictionary and replaced all qus with q, our Trie doesn’t care if the word “qeen” really represents the word “queen”, it’s just doing what it’s told and matching prefixes and words!
So later on if a word we’re searching for is found in the Trie, when we add it to the list of valid words we can just undo our replacement of q with qu so it makes sense to us!
Algorithm
Now that we have our Trie and we can populate it with a dictionary of words, we need to intelligently traverse our Boggle board and check our Trie to see if our letter combinations are valid words.
Let’s take a look at the implementation of the solve function:
// crate/src/board.rs

//...
impl Board {
  pub fn solve(&self, trie: &mut Trie) -> HashSet<String> {
    println!("\nSOLVING...");
    let mut words: HashSet<String> = HashSet::new();
    let mut visited_positions;
    let mut current_string;

    // hit each letter in the board and call find_words on it
    for x in 0..self.width {
      for y in 0..self.height {
        // reset the following for each new root letter we start at
        current_string = self.get((x, y)).to_string();
        visited_positions = Vec::from([(x, y)]);

        let words_for_char = find_words(
          self,
          x,
          y,
          &mut visited_positions,
          &mut current_string,
          trie,
        );
        words.extend(words_for_char);
      }
    }

    return words;
  }
}
The solve function inside our board struct keeps track of the overall list of words, the visited positions for a given chain, and the current working chain string. Here we iterate over each letter, calling the function find_words on the given tile.
Let’s take a look at the find_words function as this is where the bulk of the complex logic takes place.
// crate/src/board.rs

fn find_words(
  board: &Board,
  x: i16,
  y: i16,
  visited_positions: &mut Vec<(i16, i16)>,
  current_string: &mut String,
  trie: &mut Trie,
) -> HashSet<String> {
  let mut found_words: HashSet<String> = HashSet::new();
  let mut is_word = false;

  // if the current working word is not in the trie, return early.
  // otherwise add our current working word to our found_words list
  if !trie.find(current_string, &mut is_word) {
    current_string.pop(); // pop off the bad letter we added

    return found_words;
  }

  println!("✅ the prefix \"{}\" is in the trie!", current_string);

  if is_word {
    println!("\tAND its a full word!");

    // insert the word, and replace q with qu to finish the handling of the qu tile
    found_words.insert(current_string.to_string().replace("q", "qu"));
  }

  for (n_x, n_y) in NEIGHBOURS.iter() {
    let new_x = x + n_x;
    let new_y = y + n_y;

    // if the neighbour is within the board and hasn't already been visited, recurse, searching the neighbour for words
    if within_board(board, (new_x, new_y)) && !visited_positions.contains(&(new_x, new_y)) {
      current_string.push(board.get((new_x, new_y))); // add the character to current string and search this new string

      let last_visited_idx = visited_positions.len();
      visited_positions.push((new_x, new_y));

      let words_for_char = find_words(board, new_x, new_y, visited_positions, current_string, trie);
      found_words.extend(words_for_char);

      visited_positions.remove(last_visited_idx); // remove the added visited position
    }
  }

  current_string.pop();

  return found_words;
}
Here you can see there are two main parts of the function:
- The 1st half which checks if the
current_stringis in the Trie.- If it isn’t, remove the last char and exit early
- Otherwise, if its in the Trie and its a full word, add it to the word list
- The 2nd half contains a
forloop which visits all neighbours of the the letter, recursively calling thefind_wordsfunction on thecurrent_string+ the char we want to check.
By the end of this recursive call, we have generated a list of possible words for the entire board! If you wish to see more details of the solver be sure to check the repository for the full code.
Improvements that could be made:
- Multithreading: Adding support for multithreading could make this program run much faster by splitting this problem up per letter block on the board.
- Feel free to let me know any other things that could be improved in the comments!
Dictionary
For the dictionary I decided to use this list of over 466k english words. Now of course, some of the fun of Boggle is being able to debate with your friends whether or not a word should really be allowed (like c’mon aaa isn’t really a word).
Keeping the debate in mind, I decided to include as many as possible and leave the questionable ones up to the player’s discression.
Importing
The dictionary is stored in a .txt file which is loaded when the program starts. For loading the dictionary file I decided to use the Rust include_str! macro to ensure the dictionary was loaded in the final compiled executable rather than using potentially slower file I/O.
Here’s the snippet where I load the dictionary file:
// crate/src/lib.rs

//...

let word_list = include_str!("../word_lists/words_alpha.txt")
  .split("\r\n")
  .map(|str| str.to_string())

//...
Running the Rust Program
Now that we have this all working, its easy to solve a boggle Board from within a Rust program!
// crate/src/main.rs

use roggle;
use std::env::args;
use std::process::exit;

fn main() {
  let args: Vec<String> = args().collect();

  match args.len() {
    1 => {
      println!("No board argument provided!");
      exit(1);
    }
    _ => (),
  }

  let board = &args[1];

  println!("solutions: {:?}", roggle::solve(board));
}
cargo run "aeol iejm pdls orkf"
# Building Trie... Done!
# values:
#        a       e       o       l
#
#        i       e       j       m
#
#        p       d       l       s
#
#        o       r       k       f
#
#
# width: 4
# height: 4
#
# SOLVING...
# solutions: {"jeel", "pod", "oped", "dia", "prod", "pro", "edp", "dee", "die", "dope", "aid", "joel", "jms", "idee", "joe", "sml", "flea", "dea", "pork", "pee", "fld", "pea", "ope", "pdl", "dorp", "delfs", "drop", "ord", "edo", "dei", "pia", "orl", "olm", "sled", "loed", "odea", "elks", "aide", "els", "elm", "dip", "loe", "flee", "podia", "eom", "ped", "pelfs", "ode", "epi", "elk", "dkl", "jee", "fled", "moed", "delf", "oms", "orle", "dlr", "jed", "rld", "del", "jeep", "aiel", "dep", "diel", "depr", "lepid", "rodeo", "moe", "mol", "eide", "dks", "dop", "ido", "ipr", "dor", "eels", "peai", "ide", "led", "porks", "sld", "lea", "elf", "por", "odel", "pedro", "deia", "eld", "pied", "eel", "elms", "idle", "ideo", "pelf", "rode", "idea", "roped", "rope", "jeed", "leo", "rle", "lei", "lep", "rod", "pie", "msl", "slee", "dels", "lee"}
Compiling To WASM With wasm-bindgen
The crate wasm-pack , wasm-bindgen and Rust’s built-in support for WASM allows for a super easy way to compile our crate to WASM and call it from within JavaScript! The way I did this was by creating a new cargo project called wasm-pkg . In this project I created a barebones solve() function which simply takes a board argument, and calls into our Rust crate’s solve function. By adding the #[wasm_bindgen] attribute to our solve function, wasm-pack and wasm-bindgen will easily compile our Rust code to WASM, and create the necessary files needed to call this function from our JavaScript code. Here is the main wasm-pkg/src/lib.rs file:
// wasm-pkg/src/lib.rs

mod utils;

use roggle;
use wasm_bindgen::prelude::*;

// When the `wee_alloc` feature is enabled, use `wee_alloc` as the global
// allocator.
#[cfg(feature = "wee_alloc")]
#[global_allocator]
static ALLOC: wee_alloc::WeeAlloc = wee_alloc::WeeAlloc::INIT;

#[wasm_bindgen]
pub fn solve(boggle_board: String) -> String {
  let solution_set = roggle::solve(&boggle_board)
    .into_iter()
    .collect::<Vec<String>>()
    .join(", ");

  return solution_set;
}
And that’s it! Now we can build our crate targeting Web Assembly by running the following command from within wasm-pkg:
wasm-pack build --target web
Running this command will create a new directory called pkg which contains our compiled .wasm file, JavaScript glue code, TypeScript definitions, a README and a package.json.
wasm-pkg
|
└─── pkg/
│   │    package.json
│   │    README.md
|   |    roggle_bg.wasm
|   |    roggle_bg.wasm.d.ts
|   |    roggle.d.ts
│   └─── roggle.js
...
Publishing
Crate
I’ve never published my code to any public package site before, but I really wanted to take a stab at it. As I mentioned before, the cool part about writing this Boggle solver in Rust is that I can publish the Rust crate to crates.io, and the WASM version to NPM!
But first I needed a cool name, and with all my creativity I came up with… drumroll please… Roggle! Get it? Rust. Boggle. Roggle? Wowie I surprise myself sometimes.. I even put my rusty Photoshop skills to the test by trying to make a logo:
![]()
Now that I had a sweet name and bangin’ logo, I could publish my first ever Cargo crate with:
cargo publish
Check out Roggle on crates.io!
NPM Package
The pkg directory generated by wasm-pack is all ready to publish to NPM with just one command as well:
cd wasm-pkg/pkg
npm publish --access=public
Check out Roggle on NPM!
Putting it All Together
Calling the OpenCV + TensorFlow Code
Calling the ImageProcessing class worker handler is nice and simple to use from within our Svelte component:
// site/src/Component.svelte

async function extractBoard() {
  extractingBoard = true;
  error = null;

  var memCanvas = document.createElement("canvas");
  memCanvas.height = canvas.height;
  memCanvas.width = canvas.width;
  var memCanvasCtx = memCanvas.getContext("2d");
  memCanvasCtx.drawImage(videoEl, 0, 0, canvas.width, canvas.height);

  const image = memCanvasCtx.getImageData(0, 0, canvas.width, canvas.height);
  const processedImage = await imageProcessing.imageProcessing(image);
  const payload = processedImage.data.payload;

  if (typeof payload === "string" && payload.toLowerCase().includes("error")) {
    error = processedImage.data.payload;
    return;
  }

  extractingBoard = false;
  board = payload;
}
In the above JS/Svelte code, we capture a screenshot of the current video feed and await our imageProcessing() function from the ImageProcessing class. Once finished, we set the board state variable to the response of the imageProcessing() function call.
Calling Boggle Solver Code
Importing WASM packages generated by wasm-pack into JavaScript is pretty quick and easy, and there are a ton of great tutorials online:
But for me, since I want to use a Web Worker, the above tutorials didn’t exactly cut it for me. By following the same Aral Roca tutorial I used to run OpenCV.js and TensorFlow.js in a Web Worker, I was able to get my own Boggle solving WASM module running in the same way. Feel free to check out the code to see how I got it working!
These are the steps I’m using to call my Boggle solving WASM code from within a Svelte component:
- Component.svelte: calls
roggle.solve(board)and updates the UI with the list of words - roggle.js: A JavaScript class called "Roggle" spawns a WebWorker and passes the board along
- roggle.worker.js: A Web Worker script which imports, initializes, and executes the WASM Roggle module by calling
solve(). Once complete, the worker callspostMessage()with all the possible words
The solutions are then passed back up the chain to component.svelte.
Calling the solveBoard() Function
If you haven’t used Svelte/SvelteKit before, no worries as I won’t go into too much detail on the Svelte-side of things!
After we’ve called the solve() function and received a list of all the possible words you can make on the board, it would be cool calculate the amount of points each word is worth and display it to the user.
// site/src/Component.svelte

<script>
  async function solveBoard() {
    // UI state
    solutions = null;
    solving = true;
    error = null;


    console.log("Solving...");
    const start = new Date();

    try {
      // call the Roggle class, which calls the Web Worker, which calls the WASM module
      const res = await roggle.solve(board);

      if (res.data.solutions === "") {
        solutions = [];
      } else {
        // calculate how many points each word is worth
        solutions = res.data.solutions
          .split(", ")
          .sort()
          .map((word) => {
            let points;
            switch (word.length) {
              case 0:
                points = 0;
                word = "";
                break;
              case 3:
              case 4:
                points = 1;
                break;
              case 5:
                points = 2;
                break;
              case 6:
                points = 3;
                break;
              case 7:
                points = 5;
                break;
              default: // 8 or higher
                points = 11;
            }

            return { word, points };
          });
      }
    } catch (err) {
      console.error("ERROR:", err);
      error = err;
    }

    const end = new Date();
    console.log("completed in", (end - start) / 1000, "seconds");

    solving = false;
  }
</script>

// show the solutions to the user
{#if error}
  <p style:color="red">{error}</p>
{/if}
{#if !solving && solutions}
  <tbody>
    {#if solutions.length === 0}
      <p>no solutions!</p>
    {:else}
      {#each solutions as { word, points }}
        <tr>
          <p>{word} ({points} pt{points > 1 ? "s" : ""})</p>
        </tr>
      {/each}
    {/if}
  </tbody>
{/if}
Using a simple JS switch statement, and then updating the UI with the list of words using Svelte, we now have a working demo!
Thank you so much for reading all the way through, feel free to contact me directly at parker@prowe.ca or leave a comment below if you have any questions 😊